Gobiz thông báo chuyển đổi hệ thống quản lý tài chính
Kính gửi Quý Khách hàng! Gobiz xin thông báo trong khoảng thời gian từ 22:00 đến 24:00 ngày 03/04/2025, đội ngũ PTSP sẽ
Amazon S3 hoặc Amazon Simple Storage Service là một “dịch vụ lưu trữ đơn giản” được cung cấp bởi Amazon Web Services (AWS), cung cấp lưu trữ đối tượng thông qua giao diện dịch vụ web. Amazon S3 sử dụng cơ sở hạ tầng lưu trữ có thể mở rộng tương tự mà Amazon.com sử dụng để chạy mạng thương mại điện tử toàn cầu của mình.
(Theo Wikipedia)
Đây là dịch vụ lưu trữ đơn giản có độ bền, độ sẵn có, hiệu suất, tính bảo mật dẫn đầu ngành và khả năng thay đổi quy mô gần như không giới hạn với chi phí cực kỳ thấp.
Trong bài viết này, chúng ta cùng tìm hiểu cách tải file Java lên Amazon S3:
Trước khi bắt đầu thì phải tạo tài khoản AWS, mọi người tự search google để tạo tài khoản nhé. Sau khi có tài khoản thì lấy được accessKey & secretKey, thêm config vào file application.yml
cloud:
  aws:
    credentials:
      access-key: xxx
      secret-key: xxx
    region:
      static: us-east-2
    stack:
      auto: false
dependencies {
    implementation 'org.springframework.boot:spring-boot-starter-web'
    compileOnly 'org.projectlombok:lombok'
    annotationProcessor 'org.projectlombok:lombok'
    testImplementation 'org.springframework.boot:spring-boot-starter-test'

    implementation group: 'org.springframework.cloud', name: 'spring-cloud-starter-aws', version: '2.2.5.RELEASE'
    implementation group: 'org.apache.tika', name: 'tika-core', version: '2.3.0'
}
Chúng ta cần tạo connection để truy cập được vào Amazon S3, sử dụng interface Amazon S3.
AWSCredentials credentials = new BasicAWSCredentials(accessKey, accessSecret);
AmazonS3 amazonS3 = AmazonS3ClientBuilder
                .standard()
                .withCredentials(new AWSStaticCredentialsProvider(credentials))
                .withRegion(region)
                .build();
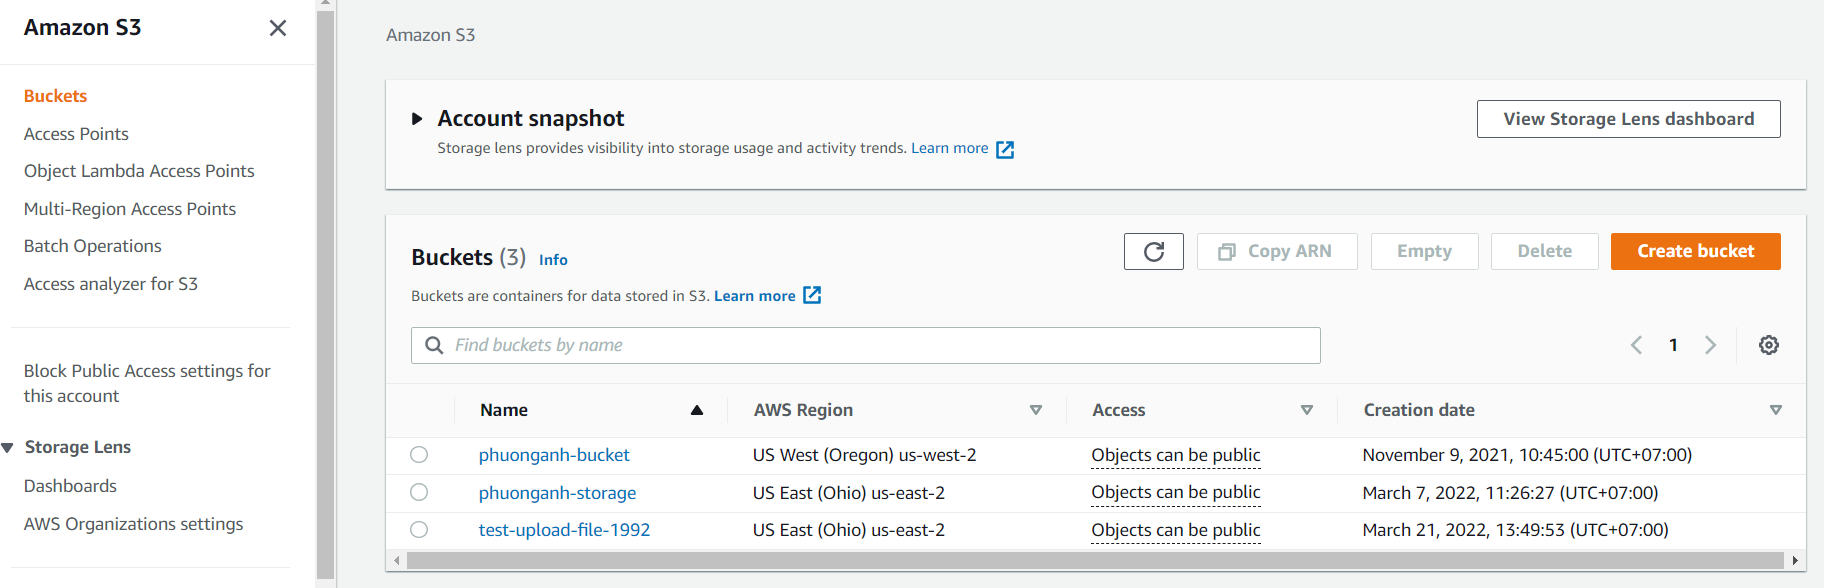
Có 2 cách tạo bucket: thao tác tay tạo trực tiếp bucket trong account của mình & tạo bằng code
Chọn service S3, vào bucket, click generate bucket. Sau khi tạo thành công thì sẽ được bucket như thế này:
Nếu tạo bằng code thì bạn cần biết 1 số quy định về bucket name, tham khảo trong docs của Amazon nhé.
Lưu ý bucket name là duy nhất trong toàn bộ Amazon S3, cho nên trước khi tạo thì phải kiểm tra lại xem bucket name này đã tồn tại hay chưa.
public Bucket createBucket(String bucketName){
        if(s3Client.doesBucketExistV2(bucketName)){
            return null;
        }
        else return s3Client.createBucket(bucketName);
    }
Khi tải 1 file lên Amazon S3, S3 sẽ lưu trữ file như là 1 S3 object. Object bao gồm file data và metadata.
Ở đây mình sẽ sử dụng PutObjectRequest để tạo request cho S3 put object lên.
1. BucketName: Tên của bucket mà ta cần upload file
2. Key
3. Input: Stream data của file
4. Metadata: Object metadata, chỉ rõ content length của stream data của file đó
public PutObjectRequest(String bucketName, String key, InputStream input, ObjectMetadata metadata)
ObjectMetadata mình sẽ set 2 giá trị contentType và contentLength.
Bạn có thể tham khảo thêm đầy đủ hơn để hiểu MIME type là gì. Mình sẽ sử dụng Tika để detect file type.
MIME Type là gì? Hướng dẫn cách cài đặt MIME Type?
Thêm depedency của Tika
implementation group: 'org.apache.tika', name: 'tika-core', version: '2.3.0'
ObjectMetadata objectMetadata = new ObjectMetadata();
objectMetadata.setContentLength(file.getSize());
objectMetadata.setContentType(tika.detect(file.getOriginalFilename()));

InputStream stream = file.getInputStream();
PutObjectRequest putObjectRequest = new PutObjectRequest(bucket, key, stream, objectMetadata);
PutObjectResult putObjectResult = s3Client.putObject(putObjectRequest);
Mình tạo 1 class FileMetadata để lấy được nhiều thuộc tính của file hơn
public class FileMetadata implements Serializable {
    private String bucket;
    private String key;
    private String name;
    private String mime;
    private String hash;
    private String etag;
    private Long size;
    private String extension;
    private String url;
    private Boolean publicAccess = false;
}
Code service đầy đủ như sau
public class StorageService {
    private final AmazonS3 s3Client;
    private final Tika tika = new Tika();

    @Value("${application.bucket.name}")
    private String bucketName;

    public List<FileMetadata> createAttachment(List<MultipartFile> files) {
        List<FileMetadata> attachments = files.stream()
                .map(file -> {
                    String fileKey = "uploadFile-" + file.getOriginalFilename();
                    FileMetadata metadata = put(bucketName, fileKey, file, true);
                    return metadata;
                })
                .collect(Collectors.toList());
        return attachments;
    }
    public FileMetadata put(String bucket, String key, MultipartFile file, Boolean publicAccess) {
        FileMetadata metadata = FileMetadata.builder()
                .bucket(bucket)
                .key(key)
                .name(file.getOriginalFilename())
                .extension(StringUtils.getFilenameExtension(file.getOriginalFilename()))
                .mime(tika.detect(file.getOriginalFilename()))
                .size(file.getSize())
                .build();

        ObjectMetadata objectMetadata = new ObjectMetadata();
        objectMetadata.setContentLength(metadata.getSize());
        objectMetadata.setContentType(metadata.getMime());

        try {
            InputStream stream = file.getInputStream();
            PutObjectRequest putObjectRequest = new PutObjectRequest(bucket, key, stream, objectMetadata);
            PutObjectResult putObjectResult = s3Client.putObject(putObjectRequest);
            metadata.setUrl(s3Client.getUrl(bucket, key).toString());
            metadata.setHash(putObjectResult.getContentMd5());
            metadata.setEtag(putObjectResult.getETag());
            metadata.setPublicAccess(publicAccess);
        } catch (IOException e) {
            e.printStackTrace();
        }
        return metadata;
    }
}
Controller cho upload
@RestController
@RequestMapping("/storages")
public class StorageController {

    @Autowired
    private StorageService service;

    @PostMapping()
    public ResponseEntity<List<FileMetadata>> createAttachments(@RequestPart(value = "attachments") List<MultipartFile> files) {
        return new ResponseEntity<>(service.createAttachment(files), HttpStatus.OK);
    }
}
Test api bằng postman được kết quả như sau:
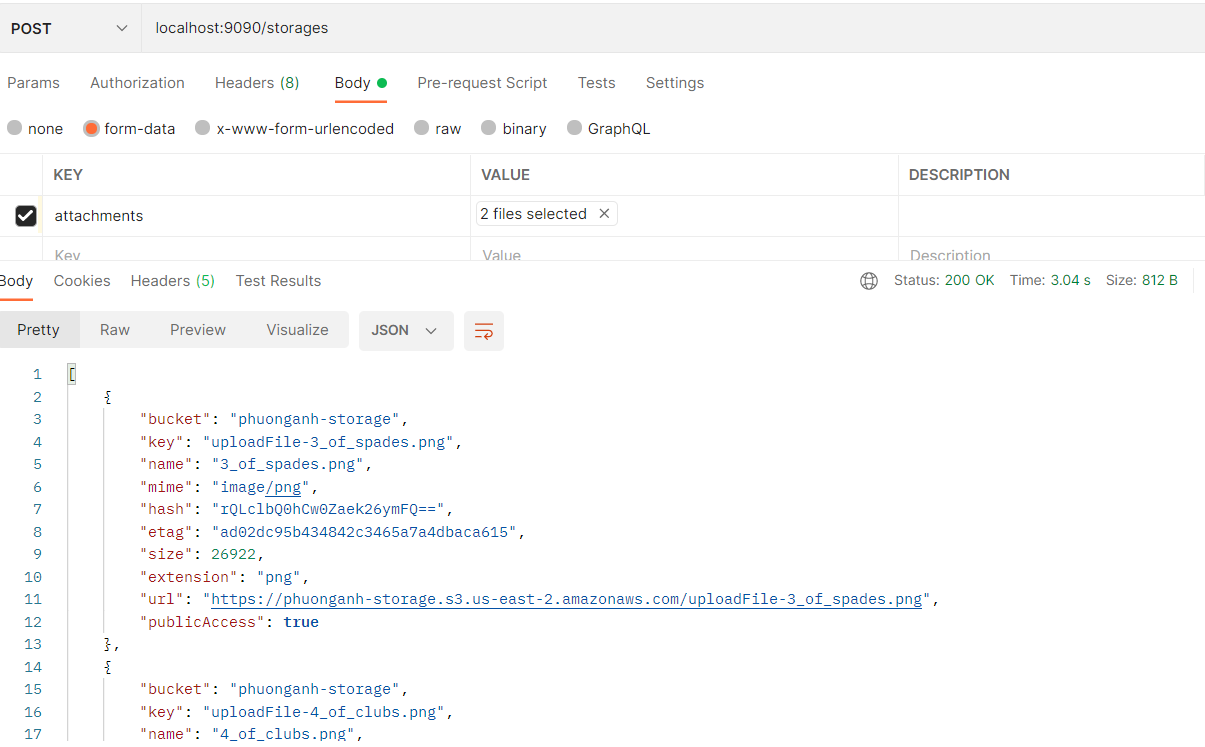
Cuối cùng bạn kiểm tra trên S3 thấy file đã upload lên là thành công rồi nhé.
Bạn có thể nhìn full code trên link github: GitHub – phuonganh1992/spring-upload-amazonS3
Lại Thị Phương Anh – Developer @ Gobiz
Xem thêm: Lưu dữ liệu BigDecimal từ Spring Data sang MongoDB
———–
✅ Gobiz – Phần mềm Quản lý nhập hàng đa quốc gia
📞Hotline: 0388.432.436
🔎 Fanpage: Gobiz.vn
🔎 Youtube: Gobiz vn
🔎 Zalo OA: Gobiz
🔎 Linkedin: Gobiz Việt Nam